


Milky-Way.Kiwi interviewed Ian Cooper, one of New Zealand’s best known astrophotographers. He has captured some stunning images over the years and in turn, we wanted to capture his thoughts on astrophotography including how to photograph the green flash, a supernova and get a stunning image of a comet. A big thank you to Ian for answering our questions and taking the time to share his experiences.
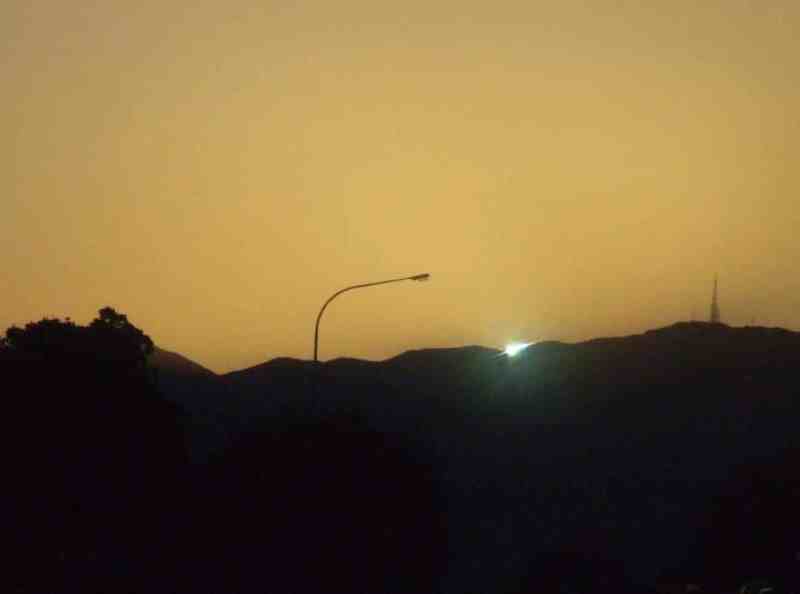
What advice would you give for photographers trying to capture the green flash?
The basic requirements are a camera that has a telephoto lens, at least with 300mm capability. A tripod. It is better if the camera can take very short exposures. 1/2000 of a second will do but 1/4000 is better. Most cameras can change their apertures (f/ratios) to the high numbers. Anything from around f/10 to f/22 will do. Set the ISO to as low as possible, say around ISO 100. The sun is bright even when low on the horizon. Since you aren’t trying to capture the foreground all of the above measures will increase your chance of capturing the colour. A typical setting arrangement might be. 300-400mm lens at f/11, 1/4000 of a second on ISO 100. The reason for the long lens is to gain image size. As in ALL photography it is best to under-expose slightly than to over-expose at all!
What encouraged you to photograph the green flash?
I had seen a few green flashes from our west coast before I started to photograph them. A book in the local astronomical society’s library dedicated to the Green Flash & produced by the Vatican Observatory in the late 50’s showed what I needed to do to get into this type of astrophotography. When I moved to my current home 31 years ago I noticed the sun rising behind a section of the Ruahine Ranges at certain times of the year. I also noticed a strong ‘blue flash’ as the first piece of the sun crested the range. Blue is the colour mostly seen across land as the sun rises or sets due to the fact that the sun is technically already ‘up’ when it rises behind a mountain range compared to when you have a sea horizon involved.

What got you into astrophotography?
My good friend and mentor Noel Munford is a professional photographer, so eventually I took up the challenge after learning how to do normal daylight photography first. It was also the desire to record astronomical phenomena in all of their many varieties that pushed me into astrophotography. My first ‘astrophoto’ was of a simple conjunction featuring Venus, the crescent Moon and Jupiter, taken 40 years ago this month (May 1978)!

What equipment did you use for your first astrophotography?
I started with a simple SLR (Single Lens Reflex) camera that could do long exposures. Usually widefield stuff. With widefield you could expose longer without tracking and the stars wouldn’t be obviously ‘trailing’ across the sky. Later on, I was doing telephoto shots involving the Moon, typically during lunar eclipses. With brighter subjects like the Moon you can do up to 4 seconds in a 400mm lens before you see movement in the subject. By the late 1980’s we were doing ‘prime focus’ astrophotography where we connected the camera body to the focal point of the telescope and used the ‘scope as the lens. We then did long exposures, sometimes up to an hour, by manually guiding on a star just outside the photograph area through an off-axis guider. Nowadays this is done by robots.
What was the photo that you are most proud of?
As I said earlier, I have photographed so many different facets of astronomy over the past four decades that it is quite hard to put one above all the rest. Comparing a brilliant shot of the aurora australis to a Total Solar or Lunar Eclipse, a Great Comet, a spectacular nebula, cluster or galaxy, or even a simple but impressive conjunction of the planets, moon and bright stars is not easy. The other problem, and you will find this is true for all astrophotographers, is that we are never satisfied, even after producing something that everyone is in awe of. We feel that we can always do better.
I would have to nominate a photo of the Great Comet of 2007 (Comet McNaught) that I took from Stonehenge Aotearoa back in January 2007. The comet had been around for a few weeks by the end of January that year. The moon was closing in on being full so it got down to only one more night where there was sufficient dark sky to get a lengthy exposure, that was also tracked. On this night there was just one hour without the bright moon and before morning twilight started. I drove the 140km to the site, got some shots in using the bright moon to light the foreground and with the comet in a light blue sky. Then I had about 3 hours sleep before tackling the photo. This was still in the film days for me BTW. I was very pleased with the final result which you see here. Photo Details: Date; 2007.01.30 Camera; Nikon F with 50mm lens at f/2, Exposure;15 minutes on Fuji Press 800 film.

What’s the most difficult Astrophotography you’ve taken and why was it so tricky?
My first attempt at prime focus photography through our local astronomical society’s telescope by myself. The object I was after was Supernova 1987A and the Tarantula Nebula in the Large Magellanic Cloud when the supernova was at its brightest! The hardest part in astrophotography, and one of the most critical, is focussing on a star. We used a knife edge while looking through the open back of the camera, before we loaded the film, to get the perfect focus. Learning new skills is always the daunting part of any endeavour. Having achieved focus you then had to be very careful that you didn’t inadvertently adjust the focus through the night.
Thirty years ago, we were doing all night astrophoto-sessions from dusk ‘til dawn and then off to work almost straight after that. We slept well the next night! For all of that effort we may have ended up with only a dozen photos depending upon the length of each exposure! Because we couldn’t directly check our results on the night we had to have all of our techniques perfect before proceeding. The advent of digital photography has opened up a world that we only dreamed about back then.
What I haven’t mentioned until now is the process involved in making fine grain film useful for astronomy. In order to capture the faint light of many astronomical subjects, especially those that we call ‘deep-sky,’ we need to have three things, preferably all three! Fast aperture, either in the lens system or the telescope which is acting like a lens. For cameras that can mean focal ratios like f/1.4, or in the telescope it can range from f/4 to f/6. Then there is the ISO Rating. In film days the average film was rated ISO 100 or 200. The benefits of this film for daylight photography was a relatively fast film retaining fairly fine grain structure so that the images could be greatly enlarged if need be. The third element was exposure length and the other two dictated that. You could cut your exposure down and thereby lessen any tracking errors on your mounting or guidance system if you were able to have a very ‘fast’ optical system.
There were higher ISO films around but they tended to be much more ‘grainy’ and less desirable because of that. Film had one other problem to overcome. Because all film was designed for daylight use, then all exposures would inherently be short, so reciprocity failure set in. This means that the films ability to keep recording light would fall off very quickly and your film would ‘fog out’ over a long exposure. To reduce reciprocity failure the film you were to use was placed in an evacuated chamber and filled with ‘forming gas,’ a combination of nitrogen and hydrogen. This was then baked at 55° C for 12 hours before the film was ready to use. Effectively you were removing moisture from the film surface and extending the film’s ability to keep recording faint light. This meant that a slow, fine-grained ISO 100 film could be exposed for an hour and still be recording. Some exposures of brighter objects could even be cut to 40 minutes! If it clouded over after the baking process, you only had 48 hours to use it, or lose it!

What would be your dream astrophotography setup?
A strong equatorial mount with a large aperture, fast Newtonian reflector. By fast I mean a short focal ratio like f/4. This is important in astrophotography in getting more light onto the receptors as quickly as possible. For large aperture we are talking 20 inches (50cm). You have to be well healed to afford not only this set-up but the building to go with it.
What advice to you have for people just starting astrophotography?
Start with simple equipment that can do the basic job, i.e. long exposures up to 30 seconds. Many off the shelf Digital SLKR cameras are suitable for level entry astrophotography. Cameras in the $700-$1,100 range. The great thing about digital cameras is that running costs aren’t expensive. All the image details are stored in the image file so that you can go back and find what works well and what doesn’t! Plenty of scope for experimentation so that your learning curve can be steep, which is what you want!
How do you think astrophotography can contribute to science?
Many people these days get into photographing the night sky and in particular the Milky Way as seen from the southern hemisphere. Widefield lenses are popular for this subject. Widefield lenses increase your chance of capturing bright meteors, even fireballs and bolide meteors (often brighter than Venus!) People then post these images to the likes of FB pages where scientists can gather info from them regarding things like possible meteor radiants and the frequency of very-bright meteors.
Although the sun is now heading towards solar minimum (the low point in solar activity between two periods of solar maxima) presently, activity will ramp up again at the start of the next decade. Digital cameras have already proved invaluable in their ability to record faint aurorae, and they have also led to the discovery of a few auroral features, either unknown, or not well known at all. This will only improve as technology in digital cameras advances. The sheer number of people involved has brought this about. The biggest challenge for the scientific community is to collate all of this ‘free’ data from ‘citizen scientists!’
The Milky Way Kiwi is a famous icon now in New Zealand and many people claim they have discovered it but I first heard of the story from you. Can you tell us how it all started?
I first heard of the Milky Way Kiwi in the late 1980’s, most likely at the early STARDATE conferences in Taranaki where people gathered from all over the North Island, mostly. In the ‘film’ days not so many people tackled astrophotography, and there was no internet for people to discuss things as quickly as today. By the time that the idea of the ‘Milky Way Kiwi’ became established, just who first thought of it was already unknown, and I have never seen any documented claim by anyone to having first mooted the idea. Nowadays things happen so fast that an ‘originator’ can be trampled in the stampede, so to speak, of people getting excited about something new!


